
_edited.png)

Photo Booth Space Requirements: Your Venue Checklist

Updated: Sep 10
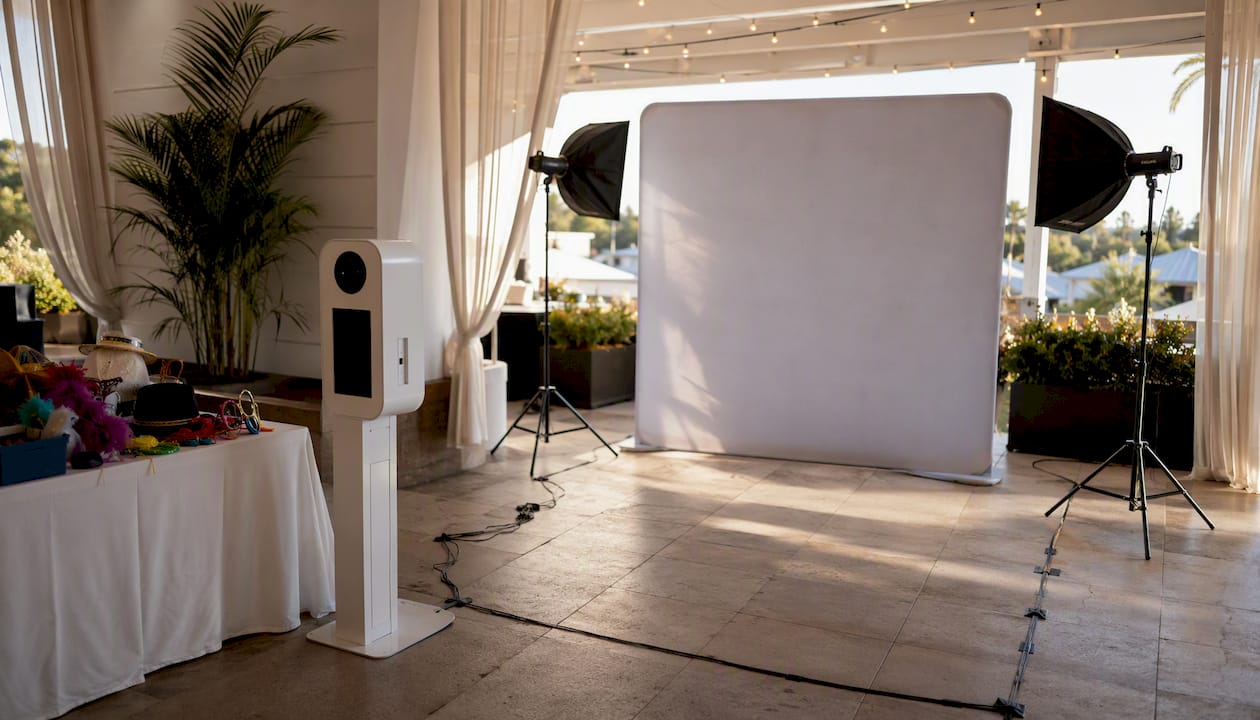
For most events, plan on a footprint that typically ranges from about 8×8 ft for a standard open-air photo booth, 6×6 to 6×8 ft for an enclosed or retro booth, about 6×8 ft for a mirror booth, and larger for a 360 video platform. Every setup needs at least one dedicated 110V 15A outlet nearby and sufficient ceiling clearance generally around 8–9 ft or more. Add a queue buffer in front of the booth and an operator zone to the side, and you have the core photo booth space considerations your venue needs confirmed before load-in day.
Quick copy-paste specs for your floorplan or vendor email:
Open-air booth: 8×8 ft footprint, 8 ft ceiling min, 1 dedicated 15A outlet within 25 ft
Enclosed/retro booth: 6×6–6×8 ft footprint, 8 ft ceiling min, 1 dedicated 15A outlet
Mirror/magic mirror booth: 6×8 ft footprint, 8.5 ft ceiling min, 1 dedicated 15A outlet
360 video platform: 12×12–14×14 ft footprint, 9+ ft ceiling, level surface, 1–2 dedicated 15A outlets
iPad/selfie station: 3×3–5×5 ft footprint, standard outlet, minimal ceiling restriction
Queue buffer (all types): 4–6 ft in front of booth per 5–10 guests expected in line
Operator zone (all types): 3×3 ft to the side or rear of the booth
Key Takeaways
The single most important rule for photo booth space planning: confirm your footprint, outlet, and queue zone in writing with both your venue and your vendor before load-in day.
Point | Details |
Core footprints by type | Open-air: 8×8–10×10 ft; enclosed: 6×6–6×8 ft; mirror: 6×8 ft; 360: 12×12–14×14 ft; iPad: 3×3–5×5 ft. |
Power and ceiling minimums | One dedicated 110V 15A outlet within 25 ft; 8–9 ft ceiling clearance for most booths; 9+ ft for 360 platforms. |
Queue and operator space | Add 4–6 ft queue buffer in front and a 3×3 ft operator zone to the side of every booth type. |
Outdoor extra clearance | Budget 2–4 ft of additional clearance around the footprint for weights, tenting, and weather protection. |
Terrifficsentertainment | Provides floorplan guidance, site-walk consultation, and dedicated attendant service for Oahu events. |
Table of Contents
Why exact space planning shapes your whole event
Getting the photo booth layout right is not just about fitting a box into a room. It directly affects how guests move, how photos look, and whether your vendor can set up without scrambling.
A cramped backdrop cuts group capacity fast. Standard 8×8 ft backdrops comfortably fit 2–5 people per shot. Squeeze the booth into a tight corner and you lose that capacity, guests start bumping into walls, and photos show clutter instead of smiles. On the flip side, a booth dropped in the middle of a high-traffic zone with no queue control creates a bottleneck that backs up into your dance floor or food station.
Operational problems hit hard when space is ignored at booking time. Power sharing across circuits can trip a breaker mid-event. A blocked load-in path adds 30–45 minutes to setup. A booth placed too close to an emergency exit triggers fire marshal concerns that can shut the whole thing down.
Pro Tip: Confirm a dedicated 15A circuit and a clear 4–6 ft queue zone at the time you book your vendor, not the week of the event. Venues fill up fast, and outlet locations are not always flexible.
Confirm the booth will not block any egress path or emergency exit
Verify the outlet is on a dedicated circuit, not shared with catering equipment or DJ gear
Mark the queue zone on the floorplan so venue staff do not set up tables there
Check ADA path width (minimum 36 in. clear) from the main guest area to the booth
Standard space needs by booth type
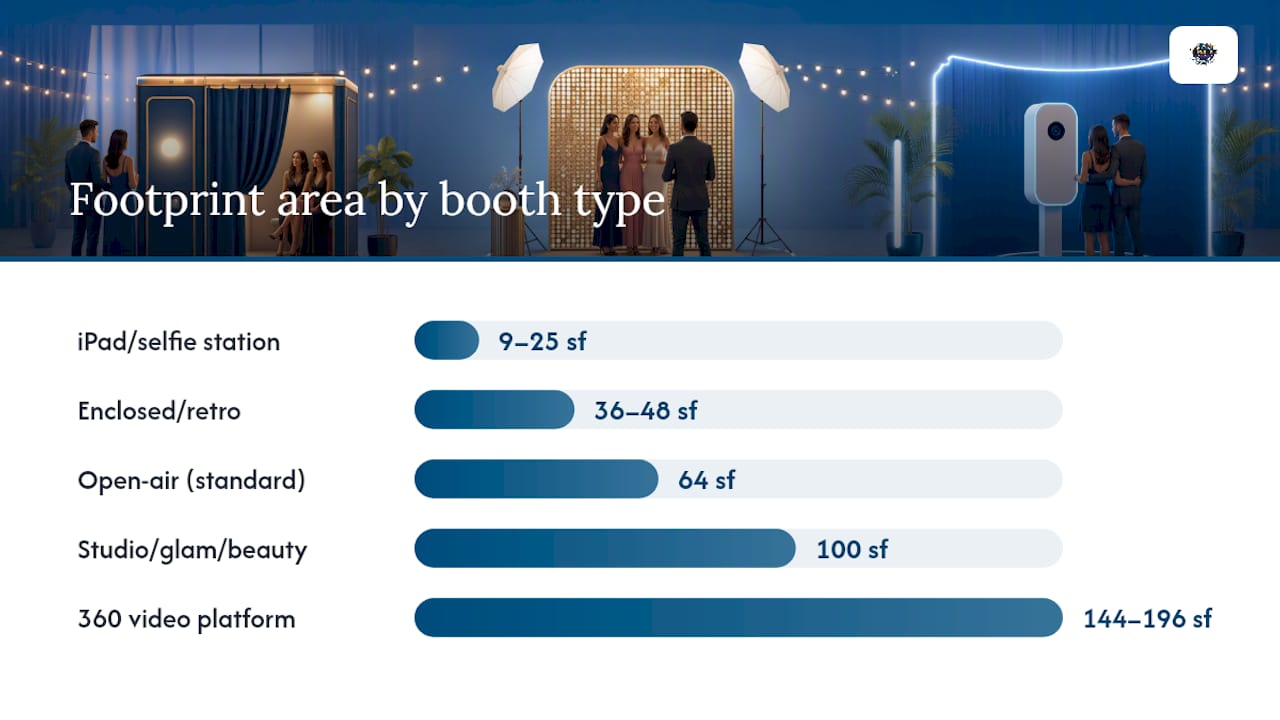
Every booth type has a different footprint, and knowing those numbers upfront saves you from awkward conversations with venue managers on event day. Most professional setups list 10×10 ft as a practical minimum for open-air booths when you include lighting stands and a guest area, while a standard setup needs about 8×8 ft of floor space at minimum. Here is a type-by-type breakdown you can hand directly to your venue contact.
Booth Type | Footprint (ft × ft / sq ft) | Height Clearance (ft) | People per Shot | Power (amps/outlets) | Indoor/Outdoor | Setup Time / Staffing |
Open-air (standard) | 8×8 ft footprint (10×10 ft recommended) | 8 ft min | 2–8 | 15A / 1 outlet | Both | 30–45 min / 1 attendant |
Enclosed/retro | 6×6–6×8 ft footprint | 8 ft min | 1–4 | 15A / 1 outlet | Indoor preferred | 45–60 min / 1 attendant |
Mirror/magic mirror | 6×8 ft footprint | 8.5 ft min | 1–6 | 15A / 1 outlet | Indoor preferred | 45–60 min / 1 attendant |
360 video platform | 12×12–14×14 ft footprint | 9+ ft | 1–6 | 15A–20A / 1–2 outlets | Hard surface required | 30–60 min / 1–2 attendants |
Studio/glam/beauty | 10×10 / 100 sq ft | 9 ft min | 1–4 | 15A–20A / 1–2 outlets | Indoor preferred | 30–60 min / 1–2 attendants |
iPad/selfie station | 3×3–5×5 / 9–25 sq ft | No restriction | 1–3 | 15A / 1 outlet | Both | 15–20 min / optional |
Backdrop widths and group capacity: Backdrop widths range from 5 ft up to 20 ft, and the width you choose directly controls how many guests fit in a single shot. A 5 ft backdrop works for 1–2 people; a 6–8 ft backdrop fits 2–5 comfortably; a 10 ft backdrop handles 5–8; and a 20 ft backdrop suits large staged group photos and branded activations. A common backdrop system measures 8 ft wide by 7.5–8 ft tall, which is why most vendors default to that size. Plan for at least a 6 ft tall backdrop for average adult guests, and go taller if your crowd includes taller guests or formal headwear.
Upsize your footprint when you are expecting large group shots, branded backdrops with sponsor logos, or oversized props. A 10×10 ft area gives guests room to spread out and keeps lighting stands from appearing in the frame.
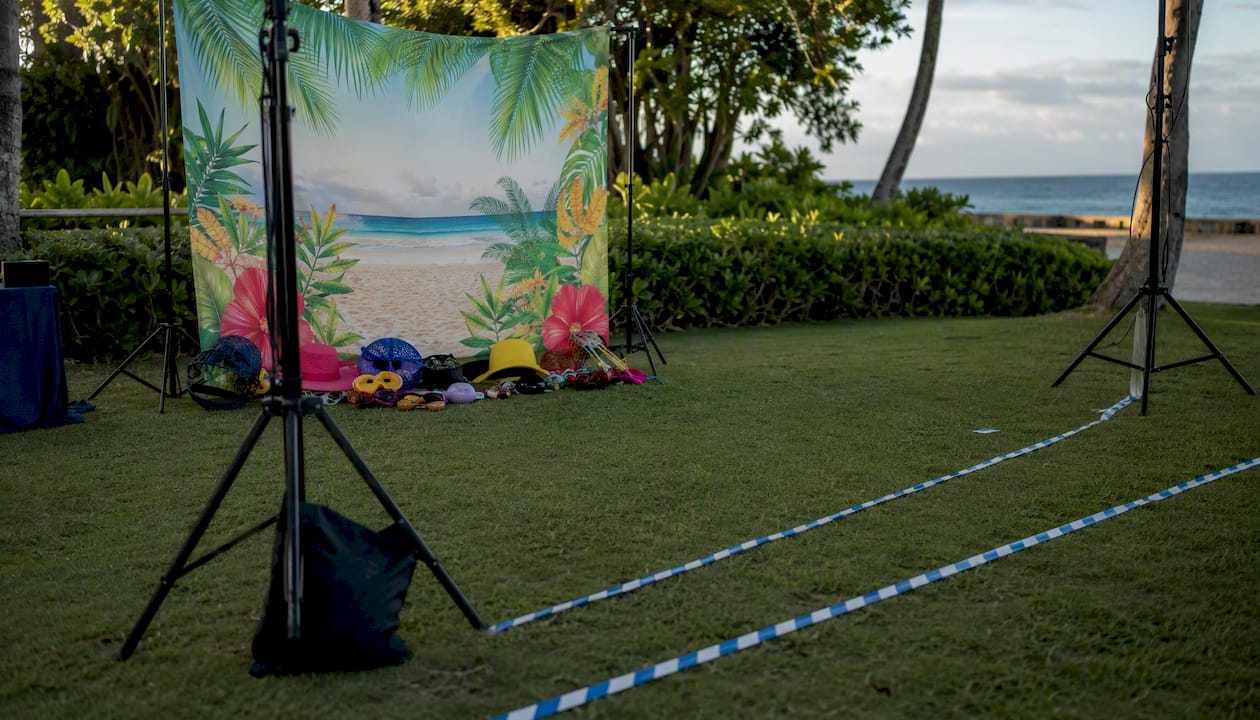
Commonly forgotten space items that catch planners off guard
The booth footprint is only part of the picture. Total footprint planning should include queue space, operator area, and a prop/print station, and the formula is straightforward: Booth + Queue + Operator + Prop Table + Social Area = Total Footprint.
Here is what each element needs:
Operator/attendant station: 3×3 ft to the side or rear of the booth. The attendant needs clear sightlines to the camera and the guest entry point.
Prop table: 4×2–3 ft, placed adjacent to the booth entry. Keep it within arm’s reach of guests without blocking the shot area.
Printing station: 3×3 ft if the printer is separate from the main unit. Some booths have integrated printers; confirm with your vendor.
Queue zone: Allow 4–6 ft of depth per 5–10 guests you expect waiting at peak time. A 50-person event with a popular booth can easily need 10–12 ft of queue depth during cocktail hour.
Camera-to-backdrop distance: The camera typically sits 2–6 ft from the backdrop depending on lens type and group size. Wider groups need more distance. Confirm this with your vendor and factor it into the total depth of the booth zone.
Lighting stand clearance: Add 2 ft on each side of the backdrop for lighting stands. Stands placed too close to walls create harsh shadows and limit adjustment.
Storage for extra props and supplies: A small rolling cart or tote bag behind the attendant station works well. Budget 2×2 ft behind the operator zone for mid-event restocking.
Pro Tip: Place prop storage behind the attendant or to stage-left so the guest-facing side stays clean and photo-ready. Use floor stanchions or tape markers to hold the queue line in place, especially at high-traffic events like weddings and graduations.
How outdoor setups and unusual venues change your plan
Outdoor events add layers to your space planning. As a general rule, budget 2–4 ft of extra clearance around the booth footprint for weights, tenting, and weather protection. A 360 booth that needs 12×12 ft indoors may need a 16×16 ft zone outdoors once you add a platform and safety stanchions.
Surface requirements: Hard, flat surfaces are the preference for every booth type. Bring leveling boards for slightly uneven ground. Avoid sand and loose gravel unless you build a platform first. 360 video booths are a poor fit for grass without a solid platform underneath.
Power planning: Outdoor venues often have limited outlet access. Plan for weatherproof cable protection and a covered power run. If the nearest outlet is more than 25 ft away, discuss a generator or battery backup with your vendor before the event date.
Weather protection: Even in Hawaii’s generally favorable climate, afternoon sun and trade wind gusts affect backdrop stability and screen visibility. A pop-up canopy or tent adds 4–6 ft to your footprint on each covered side.
Anchoring: Use sandbags on backdrop stands and booth legs. Check with the venue on any restrictions for staking or anchoring into the ground.
Pro Tip: For outdoor events on Oahu, confirm whether the venue allows generator use and whether there are noise restrictions. Some parks and beach venues have specific rules about power equipment that can affect your setup plan.
How to measure your venue and mark a floor plan
Use a check-first workflow: confirm load-in door, path, elevator access, outlet location, ceiling height, and storage space before you finalize booth placement. Terrifficsentertainment recommends a site-walk or floorplan photo to avoid last-minute surprises at Oahu venues, and that advice applies everywhere.
Measure available floor area. Note the exact dimensions of the space you are considering, including any columns, pillars, HVAC returns, or low-hanging fixtures that reduce usable area.
Check ceiling height. Measure from the floor to the lowest obstruction (a beam, a chandelier, a sprinkler head). This is your effective ceiling clearance, not the room’s peak height.
Locate outlets. Find every outlet in the zone and note whether it is on a dedicated circuit or shared. Ask the venue manager which breaker it connects to.
Map the load-in path. Walk the route from the parking or delivery area to the booth location. Note door widths, elevator dimensions, and any stairs. A 360 platform can be heavy and wide.
Mark the floor plan. Draw the booth footprint as a box, add arrowed entry and exit paths for guests, mark the outlet location with a symbol, and shade the queue zone. Photograph the space and send it to your vendor for confirmation.
Sample language to paste into your venue or vendor email:
Venue check item | What to confirm |
Floor area | Exact ft × ft dimensions, clear of obstructions |
Ceiling height | Lowest point in the booth zone (not room peak) |
Outlet | Dedicated 15A circuit, within 25 ft of booth center |
Load-in path | Door width, elevator size, stair count |
Storage space | 2×4 ft minimum behind attendant for supplies |
Typical setup times and staffing by booth type
Vendor arrival time is one of the most overlooked details in event timelines. Book your vendor to arrive with enough lead time to set up, test, and troubleshoot before the first guest walks in.
Add 30–60 minutes of buffer after setup for testing printers, lighting calibration, and social-sharing features before guests arrive
For events over 100 guests, add a second attendant or a dedicated print runner to keep the line moving
Confirm with your venue whether load-in access starts at the same time as vendor arrival, or whether there is a separate load-in window
Fire codes, ADA access, and venue policies you need to confirm
Skipping these checks is the fastest way to have a venue manager ask you to move the booth mid-event. Always confirm booth placement with both the venue coordinator and, for larger events, the fire marshal.
Egress clearance: The booth must not block any emergency exit, fire door, or required exit path. Most fire codes require a minimum 44 in. clear path to exits.
ADA access: Maintain a minimum 36 in. clear path from the main guest area to the booth. If the booth is on a raised platform, confirm ramp access or an accessible alternative.
Outlet and circuit approval: Get written confirmation from the venue that your vendor’s power draw is within the circuit’s capacity. High-draw studio setups may need a dedicated circuit or a generator.
Rigging and ceiling restrictions: Some venues prohibit ceiling rigging or hanging backdrops. Confirm before planning any overhead elements.
Vendor insurance: Many venues require a certificate of insurance (COI) from your photo booth vendor. Request this from your vendor at least two weeks before the event.
Venue signoff checklist to send your venue manager:
Confirm booth footprint location on the venue floorplan (attach marked PDF)
Confirm dedicated outlet availability and circuit capacity
Confirm no egress paths are blocked by booth, queue, or prop table
Confirm ADA-accessible path to the booth
Confirm load-in access time and path
Confirm vendor COI is on file with the venue
Confirm any restrictions on ceiling rigging, outdoor anchoring, or generator use
For guidance on renting a photo booth and confirming site requirements with your vendor, review the full rental process before signing a contract.
Real-world footprints from Terriffics Entertainment events on Oahu
Here are three examples from Terriffics Entertainment setups across Oahu that show how these numbers play out in real venues.
Wedding reception at a Kapolei banquet hall: The AI-powered open-air photobooth was placed in a 10×10 ft zone near the bar, with a 6 ft queue lane running parallel to the wall. The nearest dedicated outlet was 18 ft away, well within range. Ceiling height was 10 ft, which allowed full lighting stand extension. One attendant managed the booth and props throughout the four-hour reception. The Kapolei venue setup required a quick adjustment to shift the backdrop 2 ft left to avoid a ceiling-mounted speaker, caught during the pre-event site walk.
Corporate event at an outdoor Oahu venue: A 360 video platform required a 14×14 ft zone on a covered lanai with a hard concrete surface. The venue’s nearest outlet was 30 ft away, so Terriffics Entertainment used a heavy-duty extension cord with weatherproof protection. Two attendants managed guest flow and stanchion placement. Wind was a factor, so backdrop weights and sandbags were added to all stands.
Community graduation party at a school gymnasium: An enclosed retro booth fit into a 6×8 ft corner space with an 8 ft ceiling. The gym’s outlet was on a shared circuit with the DJ setup, so Terriffics Entertainment coordinated with the DJ to stagger power draws during peak usage. A prop table was placed stage-left, and a floor tape line marked the queue zone to keep traffic away from the basketball court boundary.
Pro Tip: Always photograph the venue space before load-in day and share it with your vendor. A single photo of the outlet location, ceiling height, and booth zone saves more time than any email chain.
What we have learned from planning booth footprints
Planners who treat the photo booth as an afterthought almost always end up with a booth that is too close to a wall, sharing a circuit with the caterer, or blocking the path to the restrooms. We have seen it at venues across Oahu, and the fix is always the same: confirm the specs in writing before the event, not during load-in.
What Terriffics Entertainment prioritizes is clear communication with venues and clients before we ever load a single piece of equipment. Our fast setup process works because we do the planning work upfront, including site walks, floorplan markups, and outlet checks. That preparation is what keeps events running smoothly from the first guest to the last photo.
The one thing we encourage every planner to do: get venue signoff on the booth location, outlet, and queue zone in writing. A verbal “that should be fine” from a venue coordinator is not the same as a confirmed floorplan. When both sides have the same marked document, load-in day is easy.
Terriffics Entertainment makes footprint planning part of the service
Planning a photo booth setup across Oahu venues takes local knowledge, and that is exactly what Terriffics Entertainment brings to every event. We handle the measurements, the floorplan guidance, and the on-site coordination so you do not have to figure it out alone.
Our photobooth rental service on Oahu includes a dedicated attendant, pre-event floorplan consultation, and the kind of fast, friendly setup that keeps your timeline on track. We know Oahu venues, we know the outlet quirks, and we know how to make a 10×10 ft zone feel like the most fun spot in the room. Browse real setup examples in our event gallery and reach out to book your date or get a custom quote.
Sources
Confirm exact dimensions for your specific vendor’s booth model directly with them, since platform diameters and enclosure depths vary by manufacturer and can differ from the general ranges listed here.
Recommended
Comments