
_edited.png)

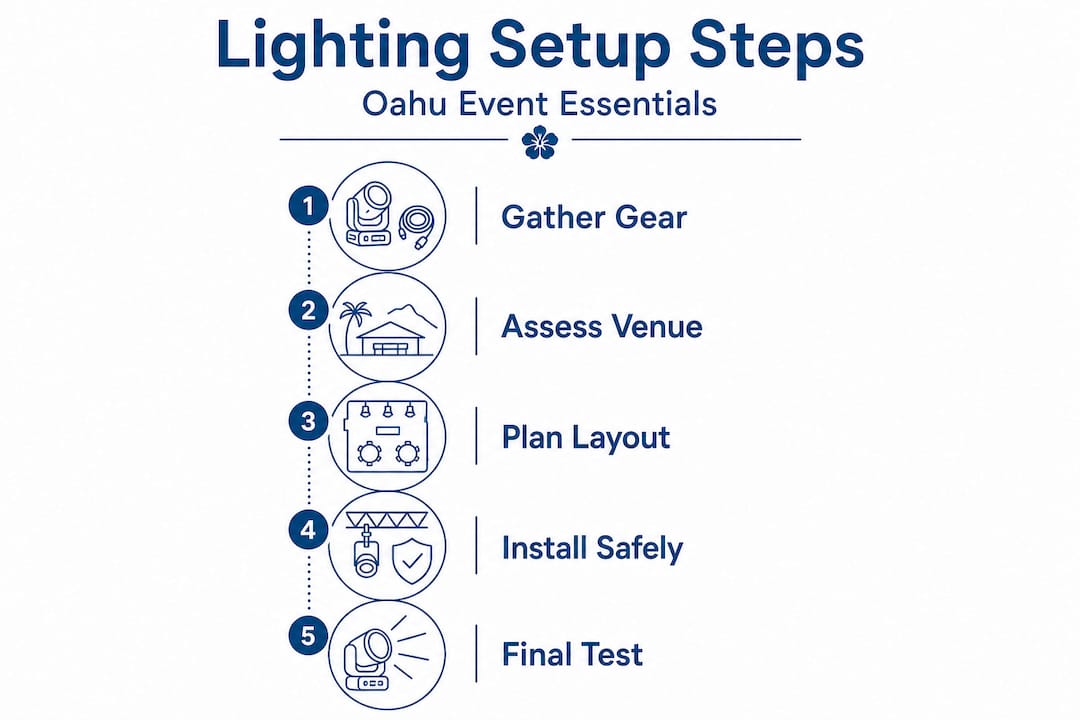
Step-by-step guide to event lighting setup on Oahu
- Terriffics Entertainment

- May 9
- 10 min read

Picture this: It’s 45 minutes before a beachfront birthday party in Ewa Beach. The string lights flicker out, the uplights are pointed at the ground, and no one can find the DMX controller. That scenario is more common than you’d think, and it happens when setup is rushed or unplanned. Good lighting is not just decorative. It shapes how guests feel, how your photos turn out, and whether the energy in the room ever really takes off. This guide walks you through every step, from assembling your gear to final testing, so your next Oahu celebration looks exactly the way you envisioned it.
Table of Contents
Key Takeaways
Point | Details |
Preparation is key | Having the right equipment and layout plan ensures a smooth lighting setup and event. |
Safety first | Always balance loads and secure fixtures to prevent accidents, especially outdoors in Oahu. |
Test before guests arrive | Thorough testing and troubleshooting before your event goes live avoids unwanted surprises. |
Adapt for the venue | Outdoor events in Oahu require weather-proof and battery-powered options for best results. |
Gathering your event lighting essentials
Once you understand why lighting is critical, the first step is assembling exactly what you’ll need. Skipping this phase leads to last-minute hardware store runs or, worse, showing up to your venue short on power cables. Getting organized early saves real time and stress.
When choosing lighting for Oahu events, your equipment list will depend on your venue, event size, and overall vibe. A corporate gala at a hotel ballroom needs different gear than a graduation party in someone’s backyard. But there are core items every setup requires.
Standard event lighting checklist:
LED wash lights for broad, even coverage across dance floors or stages
Uplights to add color and depth along walls and perimeters
Beam lights for dramatic movement and focal effects
Pin spots to highlight centerpieces, cakes, or display tables
DMX controllers to program and synchronize all your fixtures
Trusses, clamps, and safety cables for secure fixture mounting
Power distribution boxes to safely split and manage electrical load
Extension cables and power strips rated for outdoor or heavy-duty use
Gaffer tape and cable covers for safe, clean cable runs
According to step-by-step installation guidance, key equipment for any professional setup includes LED wash lights, uplights, beam lights, pin spots, DMX controllers, trusses with clamps and safety cables, and power distro boxes. For Oahu outdoor events like weddings and birthdays, you should plan for battery-powered fixtures or long cable runs due to limited outlet access. String lights, pathway task lights, and wind-secured rigs are also essential for outdoor setups.
Why Oahu outdoor events demand special attention:
Oahu’s venues are beautiful, but they come with real challenges. Outdoor spaces like parks, beach pavilions, and private yards often have very few electrical outlets. Wind is constant in many locations, especially on the North Shore or near Kailua. Humidity is also high year-round, which affects fixture performance and connection reliability.
Battery-powered LED uplights are a game changer for these settings. They eliminate the need for long cable runs and reduce tripping hazards. Wireless DMX systems also remove the need for data cables across a wide outdoor area.
Equipment type | Best for | Oahu consideration |
LED uplights | Walls, perimeter accents | Choose battery-powered for outdoor use |
String lights | Tent ceilings, trees | Secure with clips against wind |
Pin spots | Tables, displays | Use low-heat LEDs for safety |
Beam/moving lights | Dance floors, stages | Mount low and secure to prevent tipping |
DMX controller | All events | Wireless models ideal outdoors |
Calculating power needs:
Before setup day, total up the wattage of every fixture you plan to run. Divide total watts by your voltage (typically 120V in the US) to find your amperage draw. A standard 20-amp circuit should never carry more than 16 amps of load. That 80% rule is not optional. Overloading a circuit mid-event trips the breaker and kills the mood instantly.
Pro Tip: Label every power cable at both ends with colored tape before you leave home. On a dark setup site, this one habit saves enormous amounts of time and confusion.
Understanding why uplighting matters for overall ambience will help you prioritize which fixtures to invest in first and how many you actually need for your specific space.
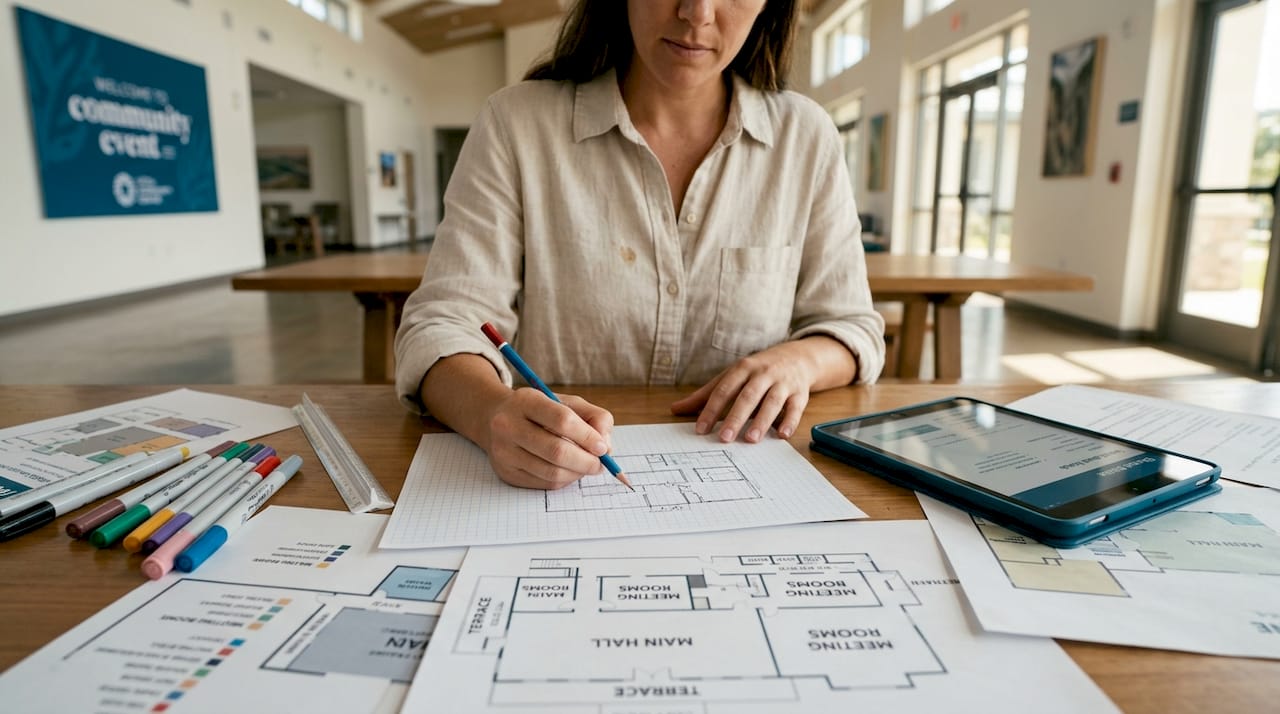
Planning your event lighting layout
With your equipment ready, next is designing a lighting plan tailored for your venue and event type. Jumping straight into setup without a layout plan leads to wasted time repositioning fixtures and tangled cable runs you did not account for.
Event lighting setup follows a structured process that begins with planning your layout and selecting fixtures based on the venue and event type. Weddings typically call for warm uplights in amber or soft white to create a romantic atmosphere. Corporate events need front wash lighting positioned to illuminate speakers clearly without harsh shadows on camera. Birthday parties often benefit from color-changing LEDs that can shift throughout the evening.
Choosing the right fixture for each event type:
Weddings: Warm white or amber uplights along walls and columns, pin spots over centerpieces and the cake table, soft front wash on the ceremony arch.
Birthday parties: Color-changing LEDs for a festive, energetic feel, moving beam lights on the dance floor, string lights overhead for a cozy, celebratory atmosphere.
Corporate events: Clean, neutral front wash lights for speaker visibility, branded color uplights in company colors, consistent and steady output without distracting movement.
Graduations and school events: Bright general wash for safety and visibility, colored accent lights in school colors, pin spots on awards tables or photo displays.
Luau and outdoor community events: Warm, tropical tones, pathway lighting for safety, wind-secured string lights and battery-powered uplights throughout.
When planning fixture placement, think in zones. Every event has a focal zone, an activity zone, and a transition zone. The focal zone is where the most important moments happen, such as the stage, ceremony arch, or head table. This area deserves your most dramatic and precisely aimed fixtures. The activity zone covers the dance floor or mingling area, where color and movement create energy. The transition zone includes pathways, entry points, and perimeter areas where soft, functional lighting keeps guests safe.
When looking at event themes and layouts, you can see how the right lighting placement reinforces the theme and makes the entire space feel intentional rather than accidental.
Event type | Recommended fixtures | Color temperature |
Wedding | Uplights, pin spots, wash | Warm white (2700K-3000K) |
Birthday | Color LEDs, moving heads | RGB full color |
Corporate | Front wash, neutral uplights | Neutral white (4000K) |
Graduation | Bright wash, color accents | Cool white + school colors |
Luau/outdoor | String lights, battery uplights | Warm amber, tropical RGB |
Sketch your layout before you go:
Draw a simple floor plan of your venue. Mark power outlet locations, rigging points like beams or truss stands, and the position of key event elements like the DJ booth, stage, and tables. Then assign each fixture a spot on the map. This sketch does not need to be architectural. It just needs to be clear enough that your setup crew can follow it without asking questions every five minutes.
Executing a safe and reliable lighting setup
Now that your plan is finalized, it’s time to turn your vision into reality with a safe and robust setup. This phase is where most mistakes happen, so taking a methodical approach matters more than moving fast.
Install rigging and mount fixtures securely with safety cables, then run power distribution and DMX cabling while ensuring load balancing. The standard rule is to never exceed 80% of any circuit’s rated capacity. This protects your equipment and your guests.
Step-by-step installation process:
Set up rigging first. Position truss stands, pipe-and-drape systems, or stake-and-pole rigs before placing any fixtures. Confirm stability by applying gentle pressure to each rig point.
Attach fixtures with safety cables. Every fixture hung from a truss or overhead structure must have a secondary safety cable in case the primary clamp fails. This is non-negotiable.
Mount fixtures to their assigned positions. Follow your layout sketch. Aim each fixture roughly before you connect power, so you are not adjusting aim while electricity is running.
Run power distribution. Connect your power distro box to the main power source. Branch out to each zone. Label each circuit with what it serves.
Run DMX data cables. DMX is a signal protocol that lets your controller talk to your fixtures. Run DMX cables from your controller to the first fixture in each chain, then daisy-chain from fixture to fixture. Keep DMX cables away from power cables to reduce interference.
Address each fixture. Every fixture needs a unique DMX address so the controller knows which one to command. Set addresses before you power up the full system.
Apply cable management. Use cable covers over any cable crossing a walkway. Tape cables flat along walls and edges. Keep all cables away from standing water or wet grass.
“The most overlooked step in lighting setup is load balancing. Spread your fixtures across multiple circuits rather than plugging everything into one location. A balanced load means fewer surprise breaker trips at the worst possible moment.”
Weatherproofing for Oahu conditions:
If you’re setting up outdoors, use fixtures with at least an IP54 rating, which means they are protected against splashing water and dust. Seal cable connection points with weatherproof tape if rain is possible. Keep your DMX controller and power distro box in a protected location, such as under a tent or table cover.
Pro Tip: Bring a small portable generator as a backup power source for outdoor events. Even venues with power access can experience outages, and having 15 minutes of backup power keeps you running until it’s resolved.
For more guidance on outdoor power and safety tips in Oahu event settings, we have a full breakdown that applies directly to lighting and AV setups in open-air venues.
Testing, troubleshooting, and final adjustments
With everything installed, the final step is ensuring your lighting performs exactly as planned. This is not the time to rush. Testing is where you catch problems before your guests do.
Test all lights, cues, and camera compatibility before guests arrive, and save time for final adjustments during the actual event. Professionals build at least 45 to 60 minutes of testing time into every setup schedule.
Pre-event testing checklist:
Power on each fixture individually and confirm it responds correctly
Walk through every programmed lighting cue from start to finish
Check DMX communication by adjusting one fixture at a time from the controller
Look for any fixtures aimed incorrectly or spilling light into areas they should not
Identify any dark spots in your layout and reposition fill lights if needed
Test all wireless systems for connectivity and range across the full venue
Walk the full venue to check for cable hazards, loose connections, or unstable rigs
Camera compatibility check:
Photos and video are a major part of any celebration. Lighting that looks great to the eye can look terrible on camera if the color temperature is inconsistent or if fixtures are causing a strobing effect on digital sensors. Set your lighting to a steady output and ask someone to take a few test photos from key angles. Look for harsh shadows on faces, blown-out highlights, or color casts that do not match your event’s theme. Adjust fixture angles and intensity accordingly.
Studies on event production consistently show that lighting issues are among the top three reasons event photos come out poorly, even when a professional photographer is present. Getting your lighting camera-ready before the event starts is one of the highest-value steps you can take.
Quick fixes for common issues:
Fixture not responding: Check the DMX address setting and cable connection at both ends
Color looks wrong: Verify color mode in fixture settings and check for conflicting DMX channels
Breaker keeps tripping: Redistribute fixtures across additional circuits to reduce load
String lights flickering: Replace the connection point or check for a loose bulb in the strand
For more event tips and resources, visit our blog where we cover everything from sound system setup to outdoor movie night planning for Oahu events.
What most guides miss about event lighting on Oahu
Most lighting guides are written for climate-controlled ballrooms with reliable power, solid rigging points, and experienced crew. Oahu events often involve none of those things. And that gap in advice is where real problems happen.
Here’s what we have learned from setting up events across the island: redundancy is everything. Every experienced event pro on Oahu carries backup fixtures, extra cable, spare DMX adapters, and a secondary power option. Not because they expect failure, but because Oahu’s environment punishes single-point plans.
Humidity alone is a silent problem. Connectors that worked fine in a dry environment start corroding faster in Oahu’s salt air. Fixtures left in unventilated storage can develop internal condensation. The solution is to test your gear the day before, not the morning of. Give yourself time to swap out any equipment that misbehaves.
Wind is the second underestimated variable. A setup that felt stable in your driveway can become a safety hazard when 20 mph trade winds hit at a beachside venue. Stake your base supports, add sandbags to truss feet, and choose fixtures with a lower center of gravity for outdoor use.
There is also the challenge of venues that have never hosted events before. Private homes, community parks, and beach pavilions often lack the infrastructure of a dedicated event space. Power panels can be aging, outlet access is limited, and there is no house lighting to fall back on if something goes wrong. Local event challenges like these are exactly why experienced local vendors offer such real value over shipping in equipment from the mainland.
Our honest perspective: the biggest mistake we see from first-time event organizers is underestimating setup time. Double your estimate, then add 30 more minutes. That buffer is never wasted.
Ready to light up your next Oahu event?
If you want beautiful, reliable event lighting without the hours of prep and troubleshooting, our team at Terriffics Entertainment is here to help. We handle DJ sound and lighting, karaoke, AI-powered photobooths, and outdoor movie setups for events all across Oahu.
Browse our event lighting examples to see what a professional lighting setup actually looks like at real Oahu events. Pair your lighting with our Oahu photobooth rentals for an experience your guests will keep talking about. Or explore our DJ and karaoke packages to build a complete entertainment setup that makes your celebration unforgettable. Fast setup, friendly crew, and flexible packages designed for every kind of Oahu event. Reach out today and let’s build something great together.
Frequently asked questions
How much power do I need for event lighting?
Calculate the total wattage of all your fixtures, divide by 120 volts to find amperage, and keep the total under 80% of breaker capacity to avoid overloading circuits.
What are the best lights for outdoor Oahu events?
Battery-powered uplights, LEDs, string lights, and wind-secured fixtures work best for outdoor celebrations on Oahu where outlet access is limited and weather conditions vary.
How long does it take to set up event lighting?
Plan for several hours of setup including fixture mounting, cabling, DMX programming, and testing, with larger or more complex events requiring additional time.
How can I ensure safety during setup?
Always use safety cables on fixtures, balance your electrical loads across multiple circuits, and keep all cables routed away from walkways and any sources of moisture.
What’s the role of DMX controllers?
DMX controllers let you program, address, and synchronize all your lighting fixtures from one central system, allowing real-time adjustments and automated cue sequences throughout your event.
Recommended

Comments